Production Data
This tab provides steps that identify and filter master data for use in the coding scenario.
Select product
This action step identifies the product from the master data that matches the input received by the production line. If multiple products match, the user can resolve the collision manually or the system throws an error.
| Parameter | Type | Description |
|---|---|---|
| Resolve collision manually if multiple products found | Mandatory | If enabled, the user is prompted to select the correct product when multiple products match. If disabled, the system selects automatically. |
| Lookup column | Mandatory | The column in the master data used to identify the product. |
Select production order
This action step identifies the production order from the master data that matches the input received by the production line.
This step has no parameters.
Collect list of products
This action step retrieves a filtered list of products from the master data.
| Parameter | Type | Description |
|---|---|---|
| Field to filter | Optional | The field in the master data used to filter the product list. |
| Filter | Optional | The value or pattern applied to the filter field. Only products whose field value matches are included. |
| Stop by no data | Mandatory | If enabled, the scenario stops when the filter returns no products. |
Collect list of orders
This action step retrieves a filtered list of production orders from the master data.
| Parameter | Type | Description |
|---|---|---|
| Field to filter | Optional | The field in the master data used to filter the order list. |
| Filter | Optional | The value or pattern applied to the filter field. Only orders whose field value matches are included. |
| Stop by no data | Mandatory | If enabled, the scenario stops when the filter returns no orders. |
Collect list of print jobs
This action step retrieves a filtered list of print jobs from the master data.
| Parameter | Type | Description |
|---|---|---|
| Field to filter | Optional | The field used to filter the print job list. |
| Filter | Optional | The value or pattern applied to the filter field. |
| Stop by no data | Mandatory | If enabled, the scenario stops when the filter returns no print jobs. |
Filtered record counter
This action step counts the records in a table that match a filter and makes the count available to subsequent steps.
| Parameter | Type | Description |
|---|---|---|
| Table to filter | Mandatory | The table whose records are counted. |
| Field to filter | Mandatory | The field the filter is applied to. |
| Filter value(s) | Optional | The value(s) records must match to be counted. |
| Stop by no data | Mandatory | If enabled, the scenario stops when no records match. |
Select logistic unit
This step identifies and selects a logistic unit () from the master data that matches the current coding scenario context.
Available only when the Logistic Units feature is enabled.
| Parameter | Type | Description |
|---|---|---|
| Logistic unit field | Mandatory | The field used to identify the logistic unit. |
| Throw exception if not found | Mandatory | If enabled, the scenario raises an error when no matching logistic unit is found. |
Examples
Example 1: Identifying a logistic unit to update its status
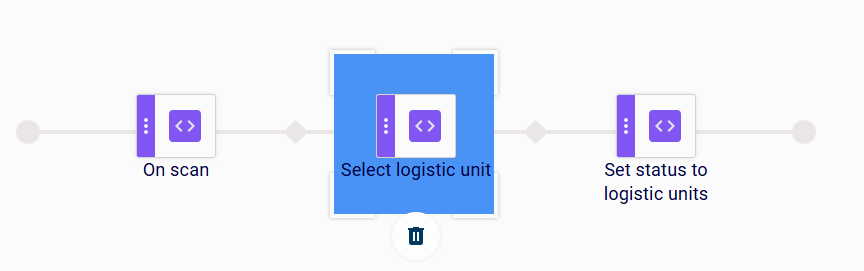
When a scan event occurs, the On scan step receives the scan input. The Select logistic unit step uses that input to find and select the matching logistic unit from the master data. The Set status to logistic units step then updates the status of the selected logistic unit.
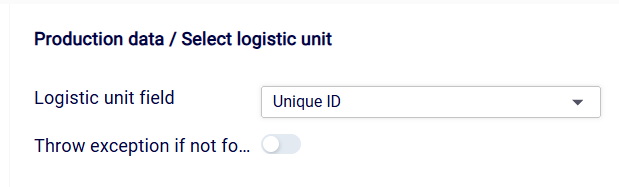
In this example, Logistic unit field is set to Unique ID to match the logistic unit by its unique identifier. Throw exception if not found is disabled, so the scenario continues even if no matching logistic unit is found.
Example 2: Selecting a logistic unit to send a print job
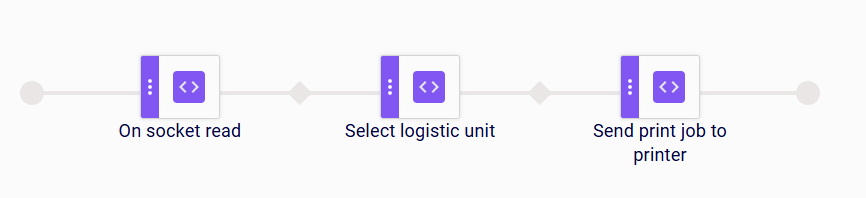
When data is received over a socket connection, the On socket read step receives the input. The Select logistic unit step uses that input to find and select the matching logistic unit from the master data. The Send print job to printer step then sends the corresponding label to the printer using the data of the identified logistic unit.
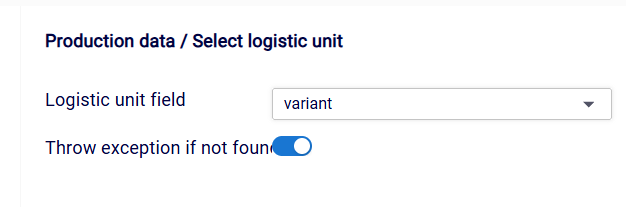
In this example, Logistic unit field is set to custom field variant to match the logistic unit by its variant. Throw exception if not found is enabled, so the scenario raises an error if no matching logistic unit is found.
Limitations
- If multiple logistic units match the input, the first matching record is returned.
Select logistic unit by identifier
This action step identifies and selects a logistic unit from the master data that matches the current coding scenario context. It works like the Select logistic unit step, except that the field used to identify the logistic unit cannot be configured: the logistic unit is always matched by its Unique ID field.
Available only when the Logistic Units feature is enabled.
| Parameter | Type | Description |
|---|---|---|
| Throw exception if not found | Mandatory | If enabled, the scenario raises an error when no matching logistic unit is found. |
Examples
Example 1: Identifying a logistic unit to update its status
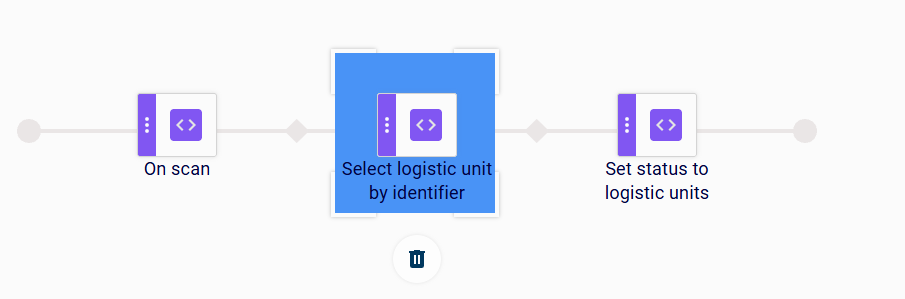
When a scan event occurs, the On scan step receives the scan input. The Select logistic unit by identifier step uses that input to find and select the logistic unit whose Unique ID matches. The Set status to logistic units step then updates the status of the selected logistic unit.
Example 2: Selecting a logistic unit to send a print job
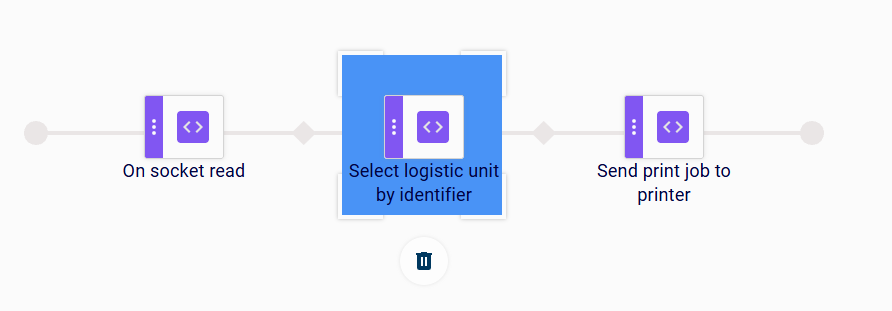
When data is received over a socket connection, the On socket read step receives the input. The Select logistic unit by identifier step uses that input to find and select the logistic unit whose Unique ID matches. The Send print job to printer step then sends the corresponding label to the printer using the data of the identified logistic unit.
Limitations
- If multiple logistic units match the input, the first matching record is returned.
Select logistic unit by status
This action step searches the master data for logistic units that have a selected status and selects exactly one of them. Which unit is selected is determined by a configurable order column and direction: the step returns the logistic unit with either the lowest or the highest value in that column, for example the unit with the lowest NVE/SSCC number. The fields of the selected logistic unit are made available to subsequent steps. Use this step to process logistic units that share the same status in a defined order.
Available only when the Logistic Units feature is enabled.
| Parameter | Type | Description |
|---|---|---|
| Status | Mandatory | The status to filter by. |
| Order by column | Mandatory | The column used to order the matching logistic units. |
| Order direction | Mandatory | Whether the step selects the logistic unit with the Lowest value or the Highest value in the order column. |
| Throw exception if not found | Mandatory | If enabled, the scenario raises an error when no logistic unit with the selected status is found. If disabled (default), the scenario stops silently. |
Examples
Example 1: Selecting a logistic unit to send a print job
When a product or production order is assigned to the production line, the Product or order assigned step starts the sequence. The Select logistic unit by status step searches for logistic units with the selected status and selects one of them according to the configured order column and direction. The Send print job to printer step then sends the corresponding label to the printer using the data of the selected logistic unit.

Create logistic unit from ZPL
This action step creates a new logistic unit record from ZPL print data received earlier in the sequence, for example over a socket connection. The unique identifier of the new logistic unit, typically the SSCC, is extracted from the ZPL string using a configurable regular expression. The created logistic unit is persisted and available to subsequent steps, for example to append further data to it.
Available only when the Logistic Units feature is enabled.
| Parameter | Type | Description |
|---|---|---|
| Unique field regex | Mandatory | A regular expression that extracts the unique identifier of the logistic unit from the ZPL. The default value is (?<=\(00\))\d{18}, which extracts the 18-digit SSCC that follows the GS1 application identifier (00). The regular expression can be adjusted per scenario step to match the format of the ZPL data. |
Examples
Example 1: Creating a logistic unit from ZPL received over a socket connection
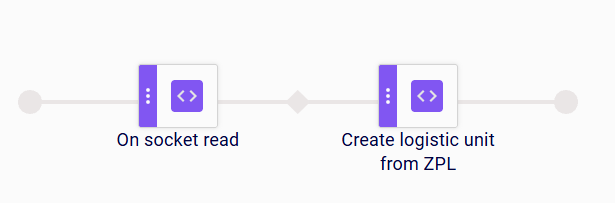
When ZPL data is received over a socket connection, the On socket read step receives the input. The Create logistic unit from ZPL step applies the configured regular expression to the ZPL string, extracts the unique identifier, and creates a new logistic unit with it.
Create logistic unit from printer log
This action step creates a new logistic unit record from a printer log entry. The printer log entry is provided by a preceding print step or by the On printer log trigger step. The unique identifier of the new logistic unit is taken from the configured unique id field, either a layout mapping field or a printer log field. The logistic unit is also initialized with the printed variables, the data of the linked product and production order, the production line it was created on, and the creation timestamp. It is persisted and available to subsequent steps, for example to append further data to it.
| Parameter | Type | Description |
|---|---|---|
| Unique id field | Optional | The layout mapping field that provides the unique identifier of the new logistic unit. |
| Unique id field (PrinterLog) | Optional | The printer log field that provides the unique identifier of the new logistic unit. |
| Link product and order | Optional | If enabled, the new logistic unit is linked to the current product and production order. |
| Get production info from printer log | Optional | If enabled, the product and production order to link are identified from printer log fields instead of the current line context. |
| Production order id field (PrinterLog) | Optional | The printer log field that identifies the production order to link. |
| Product id field (PrinterLog) | Optional | The printer log field that identifies the product to link. |
Examples
Example 1: Creating a Logistic Unit for Each Printed Label
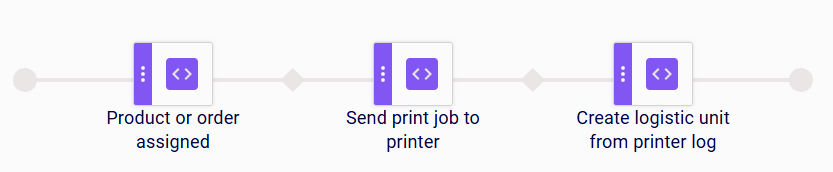
When a product or production order is assigned to the production line, the Product or order assigned step starts the sequence. The Send print job to printer step sends the label to the printer. The Create logistic unit from printer log step then creates a new logistic unit from the resulting printer log entry, initialized with the printed variables and linked to the current product and production order.
Example 2: Creating Logistic Units for Print Jobs Requested via API
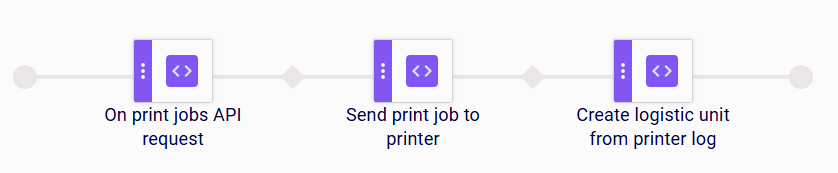
When a print job request is received via the API, the On print jobs API request step triggers the scenario. The Send print job to printer step sends the label to the printer. The Create logistic unit from printer log step then creates a new logistic unit from the printer log entry of the printed label, so every printed label results in a traceable logistic unit.
Limitations
- The step requires a printer log entry in the scenario; place it after a print step or use it with the On printer log trigger step.
Create logistic unit from scan
This action step creates a new logistic unit record from a scanned string. The scanned string is used as the unique identifier of the new logistic unit. If the coding scenario data contains production information, the current product and production order are linked to the created logistic unit. The created logistic unit is persisted and available to subsequent steps for further processing.
Available only when the Logistic Units feature is enabled.
This step has no parameters.
Examples
Example 1: Creating a logistic unit from a scan and updating its status
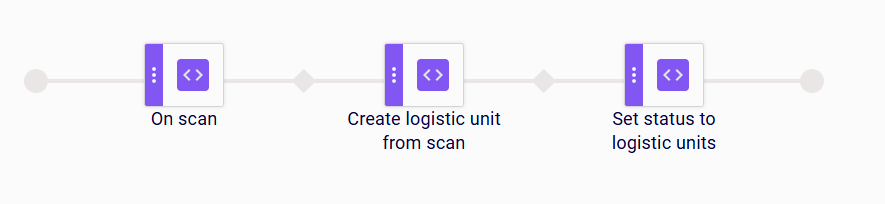
When a scan event occurs, the On scan step receives the scan input. The Create logistic unit from scan step creates a new logistic unit that uses the scanned string as its unique identifier and links it to the current product and production order. The Set status to logistic units step then updates the status of the newly created logistic unit.
Limitations
- The scanned string must be unique, because it is used as the identifier of the logistic unit.
SQL Executor
This action step runs an SQL query against an external database and makes the result available to subsequent steps.
| Parameter | Type | Description |
|---|---|---|
| Url | Mandatory | The JDBC URL of the target database. |
| Username | Mandatory | The database user name. |
| Password | Mandatory | The database password. |
| SQL query | Mandatory | The SQL query to execute. |
| First record only | Mandatory | If enabled, only the first record of the result is used. |
Append data to Logistic Unit
This action step takes the value of a layout field that was printed earlier in the sequence and appends it to a field of the last logistic unit created on the production line.
Available only when the Logistic Units feature is enabled.
| Parameter | Type | Description |
|---|---|---|
| Layout field | Mandatory | The printed layout field whose value is appended. |
| Logistic unit field | Mandatory | The logistic unit field the value is appended to. |
Examples
Example 1: Appending printed data after a print job import
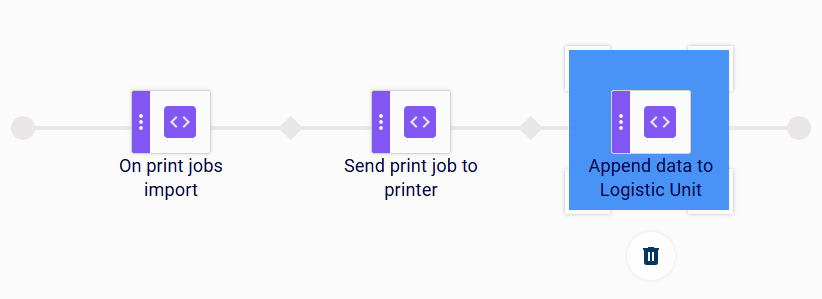
When print jobs are imported, the On print jobs import step receives the print job data. The Send print job to printer step prints the label and makes the printed layout field values available. The Append data to Logistic Unit step then appends the value of the selected layout field to the selected field of the last logistic unit created on the line.
Example 2: Appending printed data to a newly created logistic unit
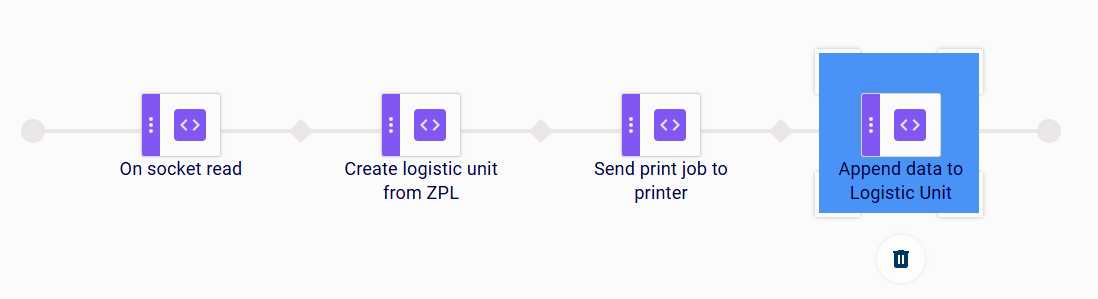
When data is received over a socket connection, the On socket read step receives the input. The Create logistic unit from ZPL step creates a new logistic unit from the ZPL print data. The Send print job to printer step prints the label and makes the printed layout field values available. The Append data to Logistic Unit step then appends the value of the selected layout field to the selected field of the newly created logistic unit, which is the last logistic unit created on the line.
Limitations
- This step uses the printed layout fields as its data source, so it can only be used in a sequence that contains a printing step. If no printing step has run before it, there is no data to append.
- If the selected layout field is not part of the printed data, the step completes without changing the logistic unit.
Assign aggregation to logistic unit
This action step assigns an aggregation layer to the current logistic unit. The logistic unit is created or selected by a preceding step, and the layer defines its position in the configured logistic unit hierarchy, for example Pallet as the upper layer and Box as the layer below it. Assigning the layer is what makes a logistic unit part of that hierarchy: units of a lower layer can then be aggregated under a unit of the layer above, for example by the Link logistic units from FIFO step. Use this step both in the scenario that creates the units to be aggregated and in the scenario that creates the unit they are aggregated under.
| Parameter | Type | Description |
|---|---|---|
| Aggregation layer | Mandatory | The layer of the logistic unit hierarchy assigned to the current logistic unit, for example Pallet or Box. The available layers come from the logistic unit layer configuration. |
Examples
Example 1: Assigning the Upper Layer to a Pallet before Aggregating Boxes
When a scan event occurs, the On scan step receives the scan input. The Create logistic unit from scan step creates the logistic unit of the pallet from the scanned value, and the Assign aggregation to logistic unit step assigns the pallet layer to it. The Link logistic units from FIFO step then aggregates the configured number of logistic units under that pallet, and the Flush FIFO step removes the units left in the queue.

Example 2: Assigning the Lower Layer to a Box before Queuing It
When ZPL data is received over a socket connection, the On socket read step receives the input. The Create logistic unit from ZPL step creates the logistic unit of the box from the ZPL print data, and the Assign aggregation to logistic unit step assigns the box layer to it. The FIFO push item step then adds the box to the queue, so that a pallet coding scenario can aggregate it later.

Limitations
- The step requires a logistic unit created or selected by a preceding step; place it after the step that creates or selects the logistic unit.
- The layers available for selection must be defined in the logistic unit layer configuration beforehand.